

Guest Blog Post by Brittani of Untitled Thoughts
When we designed the Woodland Dopp Kit, our goal was to create a pattern with the simplest possible construction—a quick, easy, and educational sew that’s approachable for those who are brand new to bag making. As a result, we chose a construction that leaves the interior seam allowances exposed, giving the finished product a somewhat rugged look.
Our Woodland instructions suggests fours to finish the seams, for stitchers who prefer a cleaner aesthetic. And our friend Brittani of Untitled Thoughts did such a nice job finishing her Woodland seams with bias tape that we invited her to collaborate with us on this blog post, which goes over all four of our suggested techniques.
Feeling empowered to make little design and construction alterations to any sewing pattern is a skill that comes with experience and a dash of bravery. It’s a way of engaging more deeply with the pattern, putting your larger skillset to use, and practicing creative problem solving. We hope this post inspires you to do just that! —KH
When it comes to finishing the interior seams of your Woodland Dopp Kit, the instruction booklet offers four methods: Zig-Zag, Pinking Shears, Serger, and Bias Tape Binding. In this post, I’m going to walk you through all four of these techniques.
In all cases, we’ll pick up from Page 6, Step 2 of the instructions, where the lining is face out, you’ve cut out the four corners, and sewn the side seams on either end of the zipper (see photos below for reference). Now it’s time to choose your seam finishing method!


1. ZIG-ZAG STITCH
Finishing your Woodland seams with a zig-zag stitch is a great option because it requires no additional tools or machinery. Almost all sewing machines have a zig-zag stitch option and only require a small shift in a dial or button to select it. My Janome simply needed to be set to the #06 stitch, as opposed to its auto setting of #00, and I was ready to go.
The goal is essentially to wrap the wrap edge of your seam allowance with the zig-zag stitch to keep it from fraying. To do this, you'll want to position your fabric so that the raw edge is aligned with the center of your standard presser foot. This ensures that the outermost points of the zig-zag stitch extend just beyond the fabric, binding the raw edges to help them not fray.
To finish your bag, you’ll box the corners (as described in the instructions) and sew them like the side seams: first with a straight stitch, followed by a zig-zag along the edge.

2. PINKING SHEARS
The second seam finishing technique is using pinking shears. If you don’t already have them, pinking shears are a great addition to any sewing toolkit. They have zig-zag blades designed to cut fabric on the bias to prevent it from fraying over time.
I like to use pinking shears on fabrics that don’t tend to fray, which is why I used them to finish the seams of my waxed canvas Dopp kit. Since you can’t throw waxed canvas into the wash, the fibers are less likely to fray. Plus, the waxed canvas I used was particularly thick, especially when combined with the lining fabric, making some of the other finishing options more difficult. I opted to pink two layers of fabric at a time, rather than all four, which was much easier on my hand!
Much like the zig-zag option, you will now sew up your boxed corners with a straight stitch. Again, because my fabric was thick, I pinked it in two steps. In order to do this on the boxed corner edges, I had to first clip into the seam to separate the four layers. Then I was able to pink two layers at a time to finish the remaining seams.


3. SERGER
This is probably the fastest seam finishing option of all. I found the four layers of fabric to be a bit to thick for a home serger to handle, so I trimmed down the two inner layers (exterior fabric) of my seams and the fabric went through my serger much more smoothly. This will also reduce the amount of work your serger blade needs to do when cutting off spare fabric. It works great, because the raw edges of your exterior fabric get encased in the serged edge, so they don’t fray! Then you just need to repeat those same steps for your boxed corners, and voila!


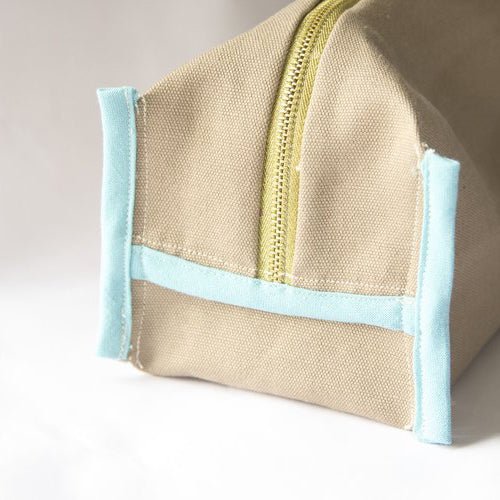
4. BIAS TAPE BINDING
Bias tape binding might be the most time-consuming method, but if you are willing to take on a little challenge, you’ll be incredibly satisfied with the results. I absolutely love binding my seams. It can add such a fun, hidden pop of color or print to any project! I chose a bright blue bias tape for my mostly neutral dopp kit.
Because the Woodland’s layers can get bulky and the bias tape adds four MORE layers of fabric to each seam, you’ll want to begin by trimming down your inner seams as we did in previous methods. (You also might want to trim down the entire seam allowance to ensure your first straight-stitch is hidden by your binding for a superbly clean look!) Then you'll pin the bias tape around the raw edge, completely enclosing it within the binding itself. Now just sew it down with a straight stitch!
Next, pin and sew your boxed corners with a straight stitch, as per usual. Then snip the corners of your boxed edges (see photo) so you are able to trim down the inner seams once again. This is important because we are adding so much extra fabric, especially at the point where the first set of binding meets the new set of binding.

Before pinning binding tape onto the raw edges of the boxed seams, we need to make sure that the ends of the bias tape look good. Fold one end of your tape back roughly 1/2" and snip two little triangles from both edges. This will help all of your raw bias tape ends stay neatly hidden after you've sewn it all into place.
Carefully pin your bias binding around the raw seam, using as many pins as you need. I tried to find my sturdiest, longest pins, since they had to go through so much fabric.
When sewing your bias tape, I’ve found that it helps to go reallllyyy slow. And don’t be too hard on yourself if you have to re-do a few of the seams. I had to rip out an entire piece and start over because I just couldn't catch one side. It can also be tricky to start RIGHT at the edge of the bias tape. Instead, try starting your stitch a bit further into your bias tape and then back stitching to the edge before continuing your seam.
Now give yourself a huge high five because you just tackled (and successfully accomplished) some beautiful bias tape bound seams!


